Saturday, March 27, 2010

A Tale of Three Yards

Well, Peggy's careful soil estimates went out the window on Wednesday, when it came time to actually purchase the soil. Peggy and Virginia visited and telephone several suppliers, but could not find one that would deliver only three yards of dirt. Consequently, they decided to buy five yards, reasoning that the gardeners could split the remainder and use it for their own gardens. The kind folks at Page Road Garden Center not only agreed to deliver this relatively small amount of soil for a reduced fee, but also promised to get it to us that very same day! Naturally, they got our business and five yards of conditioned soil (a topsoil and compost mix) were purchased forthwith.

Then it was off to the Town of Garner, which was offering 80-gallon rain barrels for a reasonable price. The rain barrel was loaded into Peggy's new Subaru with no difficulty. Pleased with their success, but hungry, Peggy and Virginia stopped for lunch at Barry's Cafe before heading home to wait for the dirt delivery. Back at the garden, the rain barrel was unloaded and Peggy prepared the garden beds with a layer of newspaper to prevent weed growth.


At about four o'clock, the Page Road delivery truck was spotted and the call to arms was raised.


And here it is. We were so surprised at the small size of the dirt pile, that we asked the driver to verify the amount in the delivery, but he reassured us that this was, indeed, about five yards.


David S was on had to help move the dirt to the garden beds, and Jane joined us a bit later.


Naturally, it took almost all of the dirt to fill our three garden beds. We decided to keep the remainder in storage, in case we needed it to top up the beds. We are also tossing around the idea of creating a cut-flower bed with the leftover soil.


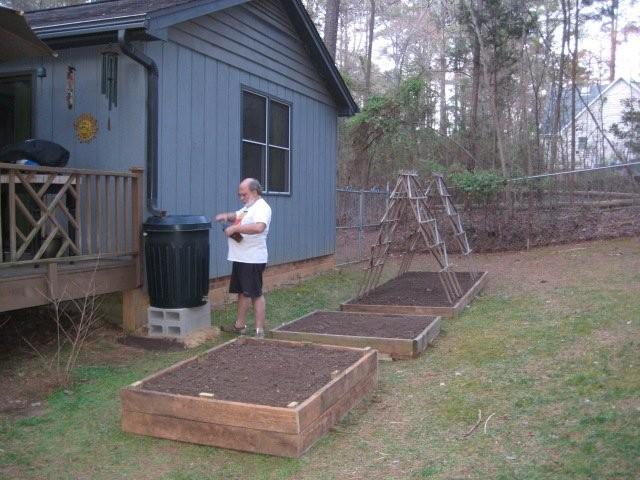
As dusk settled over Savasana, we rigged up the rain barrel. We placed it on two layers of concrete bricks, which we settled into a thick layer of builder's sand for easier leveling. David S cut the downspout to allow the rain water to flow directly into the barrel. Our plan is to direct both the main spigot and the two overflow valves into the garden beds via soaker hoses.

Planting commences tomorrow!

Tuesday, March 23, 2010

Soil Estimates

Peggy has calculated the following:

Bed 1: 6’ x 4’ x 12” Total: 0.889 cubic yds.
Bed 2: 5’ x 5’ x 8” Total: 0.617 cubic yds.
Bed 3: 12’ x 5’ x 8” Total: 1.481 cubic yds.

...which includes an extra 10% to allow for settling. This gives us a grand total of about 3 cubic yards. The soil will be ordered tomorrow, for delivery later in the week.

This coming weekend: Planting! Peggy's friend Karen has offered some seedlings, which Peggy will check out (and pick up) on Saturday.

Monday, March 22, 2010

Our beds are made!

The gardening team met on Saturday to tackle the construction of our three main garden beds. After taking a minute to remember just what we had intended to do with all that wood (...hmmm...), we measured and marked it for cutting. Our aim was to create as much length as possible in each bed, but to keep the widths to about 4.5 feet to allow for easy reaching. With the help of David squared and Greg (husbands at large), we managed to assemble the beds without having to visit Home Depot even once! David S cut our pieces of wood to size and provided additional scrap wood to make reinforcing posts, David B came through with 3-inch screws for connecting the sides, and Greg rustled up some 1/2-inch screen to cover the bottom of the tall bed.


The corners of the main gardening bed were attached with 4-inch framing anchors.


The corners and sides of the tall bed were secured with lengths of treated 2x4. 


The screen was attached to the bottom of the tall bed with staples. 


The completed garden beds were set 32 inches apart.

Voila! Ready to be filled with soil.

Jane expressed some concern that our lettuce and radishes seeds should already have been planted, so we're hoping to get the soil purchased and delivered asap, with planting to commence next weekend. After discussing the best placement of the rhubarb pips, the group decided that Virginia should plant them directly in the ground, in the northeast corner of her own garden. We're hoping this will provide a sunny yet cool location that will allow the rhubarb ample room to spread. Please send positive, nourishing thoughts to our little Southern rhubarb plant!

Photos from Day One


Our wood trimming and nail removal work area.

The preliminary layout of the garden: herb garden (top of photo), main bed with trellises (center), and wood for the deep bed leaning against the wall.


The gardeners (left to right: Virginia, Peggy, and Jane).

Saturday, March 13, 2010

The garden begins!

Today we tackled our garden design in earnest. First, we visited Logan's "One Stop Garden Shop" to pick up our "Plant a Row for the Hungry" starter kits (we chose lettuce, mung beans, and cowpea 'Purple Hull Pinkeye' as our free seeds) and to brainstorm our garden plans over lunch. To Virginia's surprise and delight, Logan's was selling rhubarb pips (we can grow rhubarb in Raleigh?!), so rhubarb was instantly added to the garden plant list. Peggy picked up some leek seedlings as well as a sparkly purple dragonfly spinner, "to keep the birds out of the garden."

Back at the garden site, we looked over the treated lumber kindly donated by Jane (the remnants of a previous porch enclosure and an old sand box) and chose several pieces that seemed like good candidates to border our raised beds. After hammering out the many, many nails embedded in said lumber, we had enough wood to build one 12x4 bed (for the veggies growing primarily above ground) and one 4x4 extra deep bed (for root veggies - this one we will secure with mesh on the bottom to prevent invasion by burrowing rodents). The sand box will serve as our new herb garden. Peggy supplied four tall wooden trellises for our climbing veggies - our plan is to lean them against each other at either end of the large bed. That way, they will act as supports for the garden fabric that we will use to protect our newly planted seeds and tiny seedlings. There was some debate about whether the trellis teepees will allow enough sun to reach all of the plants underneath them, and whether the tomato plants will have enough room under there, so we will have to see how this idea plays out. They do look good, though. Oh, and if Peggy places a dowel across the two teepees, she will have a place to hang the dragonfly spinner...

The next step is to cut the wood and build the planters - this should happen next week. Then we buy the soil, fill the beds, and start planting!

Here is the list of plants that we have chosen for our first year:

Herbs: basil, chives, dill, garlic, oregano, parsley, rosemary, sage, and thyme. These will be grown from seedlings, if possible.

Vegetables from seed (already on hand, having been purchased from The Natural Gardening Company): bok choy ('White Stemmed'), butter lettuce ('Buttercrunch'), carrots ('Scarlet Nantes'), green leaf lettuce ('Green Salad Bowl'), bunching onions ('White Lisbon'), green beans ('Emerite'), kale ('Lacinato'), parsnip ('Javelin'), radishes ('Cherry Belle'), romaine lettuce ('Jericho'), snowpeas ('Oregon Giant'), spinach ('Bloomsdale long standing'). We will also try the cowpeas from Logan's, of course.

Vegetables from seedlings: cherry tomatoes, cucumbers, eggplant, hot peppers, leek, rhubarb, summer squash, sweet peppers, tomatoes, and zucchini.

Yep, we're ambitious!